|
|
SensorGnome - fresh data from the field to your plate > How do I build a SensorGnome? > A Battery-backed Real Time Clock
A Battery-backed Real Time Clock A Battery-backed Real Time ClockEdit From $1Table of contentsThe Beaglebone does not have a persistent clock, so when it is power-cycled, its clock must be set from an external source. Normally, SensorGnomes use a GPS for this purpose, but in some deployments, (e.g. inside a metal-clad structure) this isn't feasible. For this purpose, a small Real Time Clock (RTC) evaluation board can be used to provided timekeeping when a SensorGnome is reset or powered down. As of mid 2014, the SG software will automatically detect and use such a clock to initialize the system clock at boot time. Hardware
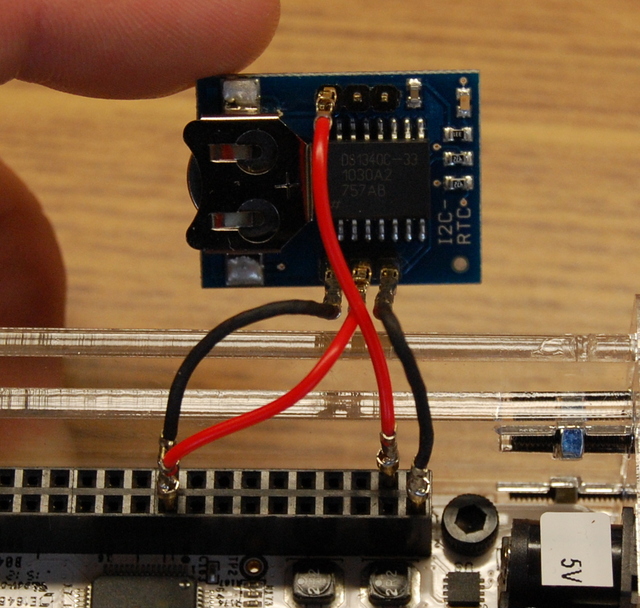
We chose the Gravitech I2C-RTC board (available here), which provides a battery-powered RTC based on the Maxim DS1340-33 RTC chip. There are drivers for this and many other RTC chips in the standard Linux kernel distribution. A 3V lithium battery must be installed in the I2C-RTC board if you want it to keep time when the beaglebone is off. Connection
The I2C-RTC is connected directly to the beaglebone's P9 expansion header using short lengths of 22 gauge wire as so:
I2C-RTC       Beaglebone
 Pin           P9 Pin #

VCC (+3.3V)       3
GND               1
SCL (clock)      19
SDA (data)       20
When correctly wired, the board's LED will be lit when the I2C-RTC is operating from Beaglebone power. However, there is a solder-trace which can be removed to disable this for low-power field deployments. Detecting and Enabling the Device
If you install the i2ctools package on your SensorGnome, and then open a shell window, you can detect the I2C-RTC using the i2cdetect command: # i2cdetect -y -r 3
0 1 2 3 4 5 6 7 8 9 a b c d e f
00: -- -- -- -- -- -- -- -- -- -- -- -- --
10: -- -- -- -- -- -- -- -- -- -- -- UU -- -- -- --
20: -- -- -- -- -- -- -- -- -- -- -- -- -- -- -- --
30: -- -- -- -- -- -- -- -- -- -- -- -- -- -- -- --
40: -- -- -- -- -- -- -- -- -- -- -- -- -- -- -- --
50: -- -- -- -- UU UU UU UU -- -- -- -- -- -- -- --
60: -- -- -- -- -- -- -- -- UU -- -- -- -- -- -- --
70: -- -- -- -- -- -- -- --
The UU in row 60, column 8 indicates a device was detected at address 0x68, which is correct for ds1307-compatible devices such as this one. To use the I2C-RTC, issue the following command: # echo ds1307 0x68 > /sys/class/i2c-dev/i2c-3/device/new_device which will generate these lines in your system log, visible via dmesg | tail [ 125.921337] i2c i2c-3: new_device: Instantiated device ds1307 at 0x68
[ 125.944866] rtc-ds1307 3-0068: rtc core: registered ds1307 as rtc1
[ 125.951495] rtc-ds1307 3-0068: 56 bytes nvram
Note: the i2ctools package is not required in order to use the device, but is helpful for debugging connection problems. Getting and Setting the RTC date/time
The device name highlighted above (rtc1) indicates where in /dev the device is to be found. You can see its date/time using hwclock, as so: # hwclock --show -u -f /dev/rtc1 ## show the i2c-rtc's date/time in UTC
Tue May 14 17:34:38 2013 0.000000 seconds
You can copy the current system clock (presumably already correctly set via ntpdate, GPS, or by hand) to the I2C-RTC by doing: # hwclock --systohc -u -f /dev/rtc1 ## set the i2c-rtc clock from the system date/time And conversely, you can set the system clock from the I2C-RTC by doing: # hwclock --hctosys -u -f /dev/rtc1 ## set the system date/time from the i2c-rtc If your kernel generated a device name other than rtc1, you must use that one instead. Accuracy
In an over-the-weekend lab test, we found the I2C-RTC drift to be on the order of 1 second per day relative to network time via ntpdate.
Was this page helpful?
Tags: (Edit tags)
|
||||||||||||||||||||
Powered by MindTouch Core |
|||||||||||||||||||||