Introduction
The software here turns your Beaglebone computer into (part of) a SensorGnome. You must install this software in your beaglebone in order to use your SensorGnome for telemetry, acoustic monitoring, etc. As of February 2014, we support both Beaglebone Black and Beaglebone White computers with a single downloadable image, regardless of what computer you intend to use for creating the micro SD card.
The image must be downloaded to your computer, and written to the micro SD card from there (i.e. not from the SG). If your computer does not have an SD or microSD card slot, you'll need to use an external one like this. Aim for the $15 to $20 range; cheaper ones can be flaky. The unit needs to be able to write to micro SDHC cards (or regular-sized SDHC cards if you have a microSD/SD adapter).
We give instructions separately for each beaglebone model, as the details are a bit different.
Beaglebone Black (BBB)

You can create a single micro SD card, and use it to install the software on the internal 2 gigabyte flash drive of any number of beaglebone blacks. The micro SD card is removed after software installation and should not be left in the beaglebone black when deployed. Instead, a blank, DOS (VFAT)-formatted micro SD card of up to 32 gigabyte capacity is installed as a data disk for deployment. In a pinch, you can get away without a micro SD data card (provided you have already installed the software on the BBB's internal flash memory), but this will only give you 1 gigabyte of storage (space left over in the BBB's internal flash memory). You can also add storage by plugging a USB memory stick into the USB hub, although we have found this less reliable in practice.
Instructions (BBB)
- download the image file from here
- use 7zip to decompress the image (download and install 7zip if you don't already have it),
OS X: 7zip is not available, but Keka is an unofficial package that works on newer OS (has been tested and works on High Sierra); for older OS, you can also use The Unarchiver or StuffIt Expander (the latter has been tested and works well on El Capitan)
- write the uncompressed image to a 4GB micro SD card:
Warning: make sure to use the correct drive in the place of DRIVE (e.g. /dev/sdd). This step can destroy
your computer's disk drive if you choose the wrong disk!
- disconnect the power and all USB cables from your beaglebone black.
- gently insert the 4 GB micro SD card into the micro SD card slot; the printed side of the card should face toward the BBB circuit board.
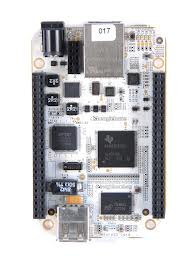
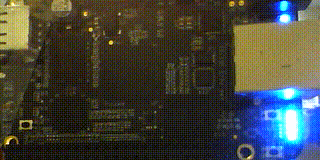
- hold down the "boot" button (see image to right for location) for several seconds while connecting power to the beaglebone black
(If you are using the orange metal case from logicsupply.com, you'll need to have the lid removed to access the "boot" button. This
first software installation is the only time you'll need to use the boot button; subsequent re-imaging will happen without holding down
the boot button.)

- the blue LEDs will indicate progress (follow links for animations of the patterns):
- two LEDs flickering sporadically for ~65 seconds indicates the BBB is booting, hopefully from the inserted SD card
- four LEDs flashing in unison for 10 seconds is a warning that the BBBs internal flash memory is about to be updated from the micro SD card.
- a slow crawling or pulsing pattern involving all 4 LEDs for up to 5 or 10 minutes indicates the software is being updated from the SD card to the internal flash memory
- all 4 LEDs on constantly indicates updating is finished
- power down the BBB by unplugging the power cable
- remove the micro SD card by gently pushing it inward (it will spring back out). This card is only used to install the software, and is not needed for deployment.
You can use it to install the software on multiple BBB.
- insert a micro SD data (32 GB or less; higher capacity cards are not supported) card into the BBB. This card will be used for data storage, and should be formatted as DOS (VFAT) - most micro SD cards come suitably pre-formatted. Instead, you can use a USB flash drive attached to the USB hub, formatted the same way.
- power up the BBB
You should now be able to access the web interface.
Note: booting and loading up the web interface takes up to 2 minutes. During this time, the LED flashing pattern is like this.

You will need one micro SD card for each BBW, because the card must remain inserted in the beaglebone when deployed. The card can be 4, 8, 16, or 32 gigabytes. Larger cards are not supported. Smaller cards do not have enough space for software and data.
You can also add storage by plugging a USB memory stick into the USB hub, although we have found this less reliable in practice.
Instructions (BBW)
You should now be able to access the web interface.
Note: booting and loading up the web interface takes up to 2 minutes. During this time, the LED flashing pattern is like this.

