|
|
From $1
Motus Users: Please refer to instructions here: https://motus.org/tag-deployment/
SensorGnome users: deployment without registration is futile - always do this step before deploying tags!
Lotek receiver users: registration lets SensorGnome users detect your tags in their data.
What is Tag Registration?
- registration is the way you tell motus what tags you are deploying
- it also verifies that your tags are behaving as advertised
- it lets us provide you with a tag database you can install on your sensorgnome to see
see live detections of your tags in the field
How can I see what tags have already been registered?
A timeline of all registered tags, deployments, and species is here:
Note: this timeline excludes a number of "privately registered" tags from a project whose funders demanded confidentiality. Booooo!
What is a registration package?
- a .ZIP or .7z archive with these items:
- a short recording of the radio output from each tag, saved as a .wav file.
These files must be called tagNNN.wav, where NNN are the 1, 2, or 3 digit tagIDs;
e.g.: tag1.wav, tag53.wav, tag 436.wav (there is an optional extra part to the filename
that tells us what frequency you recorded the tag at; see below)
- a text file telling us the tag model and other details we can't learn from the recordings.
This file must be called tagreg.txt
- the registration package should be a single folder containing tagreg.txt and all
corresponding .wav files. Please do not nest archives within archives.
Can you show me an example of a registration package?
- the uploaded file is called jmb_2017_tags.zip and contains these files:
- tagreg.txt, a text file with these lines: sections in blue are comments and are not part of the file.
PLEASE DO NOT PUT COMMENTS in tagreg.txt
motusProjID: 123              These tags are being registered under motus project 123

tagModel: NTQB-6-1            The tag model is given on the invoice from Lotek

nomFreq: 166.38               The nominal tag frequency is 166.38 MHz

species: PTWA                 Optional: anticipated species.  These tags are expected to be put
                              on PTWA (Prothonotary warbler). If some tags end up deployed
                              on other species, you can change this value for each tag later, at motus.org
                              Instead of a 4-letter code, you can also use a motus.org integer species ID.
                              Note: You can only specify one species per registration package.

deployDate: 2017-05-01        Optional: anticipateddeployment date (YYYY-MM-DD): the earliest deployment
                              date of any of these tags is expected to be May 1, 2017.
                              You should eventually provide exact deployment dates for each tag
                              at motus.org; until you do that, this date tells us when to start looking for
                              your tags in new data.

codeSet: Lotek4               Optional: the tag codeSet.  Lotek4 is the default; you can also specify
                              Lotek3
- tag335.wav, a recording of tag 335, made as below
- tag336.wav, a recording of tag 336
- tag337.wav, a recording of tag 337
- tag337.1.wav, a recording of a second tag 337 with a different burst interval (see details here)
- tag338@166.370.wav, a recording of tag 338 made at the non-default listening frequency 166.370 MHz
NOTE: please pay attention to the syntax of the tagreg.txt file - it is read by a program, not by a human being.
You can copy, paste, and edit this template:
motusProjID: 1
tagModel:    NTQB-1
nomFreq:     166.38
species:     BBGU
deployDate:  YYYY-MM-DD
codeSet:     Lotek4
Tag Models
As of 2017-12-04, these models are recognized.
NTQB-1-LW  ANTC-M1-1   ANTCW-M1-1     NTQB2-1
NTQB-1     ANTC-M2-1   ANTCW-M2-1     NTQB2-2
NTQB-2     ANTC-M3-1   ANTCW-M3-1     NTQB2-3-2
NTQB-3-2   ANTC-M3-2   ANTCW-M3-2     NTQB2-4-2s
NTQB-4-2   ANTC-M4-2S  ANTCW-M4-2S    NTQB2-6-1
NTQB-6-1   ANTC-M4-2L  ANTCW-M4-2L    NTQB2-6-2
NTQB-6-2   ANTC-M6-1   ANTCW-M6-1
NTQBW-3-2  ANTC-M6-2   ANTCW-M6-2
NTQBW-2    ACT-393     ACT-521
NTQBW-4-2  ACT-626
NTQBW-6-2
The M in the two right columns is optional, and might not appear on invoices.
Tags recorded at non-default frequencies
Normally, tag recordings are made with the funcubedongle tuned 4kHz below the nominal tag frequency. So for
most motus tags on the nominal 166.380 MHz frequency, you record at 166.376 MHz. If this
doesn't work, you can try another setting, and report that by adding the part '@XXX.XXX' to the tag filename, e.g.
tag338@166.370.wav in the example above.
The tagreg.txt file
All tags in a single registration package must have the same project ID, tag model, nominal frequency, and codeSet.
If you specify species, it is used for all tags, but you can change that on your "Manage My Tags" page at motus.org
There is a template tagreg.txt file attached to this page, which you can edit and include in your registration package.
The rest of this page explains how to obtain the .wav file recordings.
Use the appropriate hook-up procedure, then record your tags!
To register a tag, you need to make a short recording of its output using a funcubedongle attached to a PC, or from the headphone jack of a Lotek receiver.
Hook-up for SensorGnome Users
- remove a funcubedongle from a SensorGnome, and attach it to a computer USB port, ideally via a USB extension cable
- determine whether you have a funcubedongle Pro (wrapped in copper if from Acadia U.) or Pro Plus (wrapped in aluminum if from Acadia U.)
(The SensorGnome web interface will show you which model(s) you have if they are plugged into the USB hub.)
- if possible, attach a VHF antenna to the BNC jack on the funcubedongle (or be sure to hold the tag close to the funcubedongle).
- place the funcube flat on a printout of the attached layout so that the funcube's edges line up with the tracing on the layout. The layout also has a position for the tag antenna and tag base - this is where you should place each tag when recording its registration file. Standardizing the layout like this will help us notice when tags are transmitting at unduly low power levels, as might happen if the battery is low or due to a manufacturing defect.
- tune the funcubedongle receiver to the frequency 4 kHz below your tag's nominal frequency. For example, if your tag is supposed to broadcast at 166.380 MHz, tune to 166.376 MHz. This will require one of these programs:
- Windows users: use QTHID-4.1 for funcubedongle Pro Plus, and QTHID-4.0 for the original funcubedongle Pro.
- Mac OS/X users: use QTHID-4.1 for funcubedongle Pro Plus, and QTHID-4.0 for the original funcubedongle Pro.
Funcube not recognized by your computer?: if your funcubedongle Pro+ has been
attached to a SensorGnome with post July-2015 software, you'll need to use theFCHID
program to set its frequency when registering tags. The QTHID programs do not recognize
funcubedongles with the updated firmware they obtain from recent SG software.
Unfortunately, this is a windows-only solution, at the moment.
You get "audacity error opening sound device" when you hit record? You might need to delete
the drivers for the funcube (Windows). With the funcube plugged in, go into
Control Panel | Device Manager | Sound, video and game controllers
then right click on the entry for FUNcube Dongle and choose uninstall.
Remove the funcubedongle, wait a few seconds, re-insert, then wait for drivers to reinstall.
- The QTHID program allows you to change other parameters - don't do this - use the default values which are shown below. In particular, make sure LNB is 0.000 MHz! Changing LNB will change your frequency, so go back and reset the frequency directly if this happens. Set the frequency in MHz by typing it into wide frequency box with the black background (aka odometer). You can point the mouse at individual digits in the odometer and use the mousewheel to dial them up or down (but note that it changes the preceding digit when it wraps). You can also point at an odometer digit and type its replacement.
Here is what the settings should look like in both versions of the program (for tags at 166.380 MHz):
 
qthid 4.1 settings for Funcube Pro Plus qthid 4.0 for Funcube Pro
(LNA is on and Mixer gain is On, but set to 0 dB)
Hook-up for Lotek receiver Users **WARNING: Tag registration using Lotek receivers is not supported by the Motus.org automated system.**
Warning: turn off all echo cancellation and noise reduction controls, both on the Lotek receiver and on your computer's audio input jack. Failure to do so may result in distorted or even unusable registration .WAV files
- turn the volume all the way down on your Lotek receiver
- connect the headphone jack of your Lotek receiver to the line-in jack of your computer. If your computer does not have a line-in jack, you may be able to use the microphone-in jack, but you do so at your own risk - we cannot be responsible for damage to your computer's audio hardware. For the Lotek SRX-600, this connection will require a 1/4" plug to 1/8" jack adapter, or some other way to join the 1/8" jack on the receiver to the 1/4" jack on your computer.
- set the Lotek receiver to listen on the appropriate frequency
- activate a tag
- watching the microphone levels meter in Audacity (see screenshot below), slowly turn up the volume on the Lotek receiver until you red bars bouncing to the right every time the tag emits a burst. The peak levels are persistent, and should be kept away from the extreme right end of the meter by lowering the volume or microphone input level if necessary.
- de-activate the tag (this activation was just to get the volume set correctly)
Register a tag - SensorGnome and Lotek
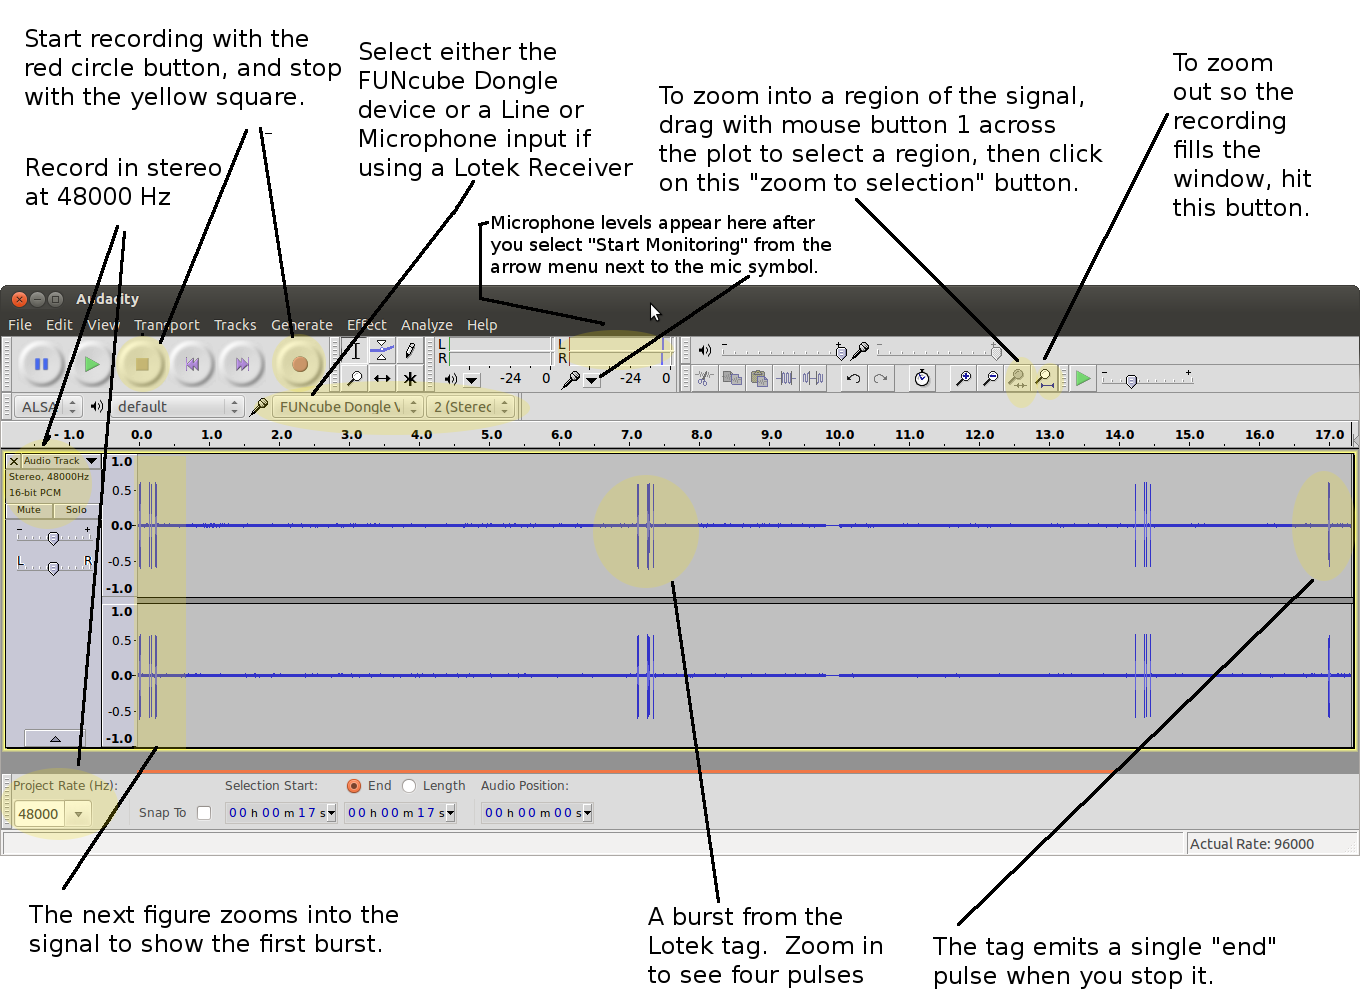
- start recording stereo audio from the funcubedongle (SensorGnome) or line in / microphone (Lotek receiver) at 48000 Hz using audacity.
You will probably find it helpful to set your default sample rate to 48000 Hz using the Edit | Preferences menu like so:

- activate your tag with the Lotek activator (you'll see an activation spike and the first burst of 4 pulses in the audacity window):
- lower your tag into the hole in the activator unit a few mm below the surface of the unit, with the label facing the "Label->" marking on the unit
- press the Start button
- this should light up the green LED on the activator for a 1-2 seconds. While the green LED is lit, further presses of the Start button are ineffective.
- if this doesn't immediately show large spikes in audacity, move the tag a little bit up or down, then repeat from step 2.
- record at least 3 consecutive bursts from the tag (e.g. if the burst interval is 10 seconds, your recording will be at least 31 seconds or so)
- de-activate your tag with the Lotek activator (you'll see a deactivation spike in the audacity window, then wait at least 1 burst interval to ensure the tag is off). If you don't de-activate, we can't guarantee that your registration file will be usable.
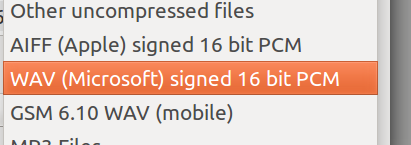
- Use File | Export... to save the recording to a file named tagXXX.wav, e.g. tag435.wav. If there are duplicate tagIDs with different burst intervals use the addition of ".1" for duplicates; eg. tag123.wav and tag123.1.wav could be present if there were two tag IDs 123 with different burst intervals.
- XXX is the Lotek tag ID - you must include this in the name
- please save files using the file type WAV ... PCM format, as shown highlighted here:
 - make sure the recording has at least 3 consecutive bursts from your tag. These will be visible as sharp vertical spikes in the audacity window, separated by the burst interval for your tag (e.g. 5 seconds). When you zoom into each burst in audacity, you should see 4 sharp spikes in each burst.
- make sure the tag you are registering is the only one active in the vicinity of the funcubedongle
- repeat this procedure for every tag you will deploy, even if it has the same ID as another tag you are deploying or have deployed (see step 5). Even tags with the same ID, burst interval, and nominal frequency can vary somewhat in detailed signal characteristics, and this information is useful for later data processing.
- make sure to do File | New or close the track between recordings, so that each recording starts with an empty track - please don't overlay different tags in the same recording
Create and upload an archive of tag recordings and metadata
- Download the sample metadata file tagreg.txt (which is attached to this page below) and edit it to match your project information:
- motusProjID: XXX (numeric project ID)
- tagModel: NTQB-??? (as given on the Lotek invoice)
- nomFreq: 166.38 (nominal tag frequency, in MHz)
- species: XXXXX (optional 4-letter code or motus numeric species ID)
Please pick one species here, or omit this line. You can change species later for individual tags.
- deployDate: YYYY-MM-DD (earliest likely deployment date for any tags)
- NOTE: each tagreg.txt file should only correspond to groups of tags with the same model, nominal frequency, and intended time frame. If applicable, create a new tagreg.txt file for each group of tags - ensure you know which tags correspond to which tagreg.txt file.
- create a .ZIP, .7z or .rar archive for each group of WAV files and its corresponding tagreg.txt file and store them somewhere safe. Eg. if all your tags are intended for the same project, with the same tag model, and the same intended deployment time, you will have one .ZIP file containing all WAV files and the tagreg.txt file. If you have a group of tags with model NTQB-1, and a group of tags that are NTQB-2, you will have have two .ZIP files; one with all the NTQB-1 WAV files and corresponding tagreg.txt file, and a second of all NTQB-2 WAV files and corresponding tagreg.txt file.
- upload the .ZIP file(s) to https://motus.org/data/project/sgJobs (requires Motus.org login and project).
https://sgdata.motus.org/upload/index.phpThis requires sensorgnome.org login credentials (email jbrzusto AT fastmail DOT fm to obtain them).
SensorGnome users: don't forget to re-install the funcubedongle in your SensorGnome if you borrowed one for registration.
What registration looks like in Audacity
Here's a screen capture of Audacity after recording the first three bursts from a tag. Here, we also capture the "start" and "end" pulses from the tag being turned on and off, but this is not necessary for registration recordings.

The bursts should each consist of four spikes that span the vertical scale in the range [-0.2, 0.2] or greater.
The ones here span approximately [-0.6, 0.6]:

NOTE: Deactivate each tag after you register it; start each recording in a new track window
If you don't do this, all active tags contribute to the registration recording, and it becomes nearly
impossible to identify the signature of the tag being registered (note the x-axis scale, which is in seconds):

This recording shows at least 10 active tags. The same problem occurs if you record different tags without closing the track
or doing File | New between consecutive tags.
Beware of Bad Pulses (SensorGnome users only)
The registration procedure is usually straightforward, but occasionally, the match between the tag's
actual transmit frequency and the listen frequency on the funcubedongle is too(!) good, which can lead
to wonky-looking pulses because the funcubedongle has trouble staying locked on the tag's frequency
(this issue is not unique to the funcubedongle).
The symptom is pulses with missing top or bottom legs, such as the second in this burst:

If you see this, try re-tuning the funcubedongle frequency to 2 kHz (rather than 4kHz)
below the nominal tag frequency (e.g. 166.378 MHz for a nominal 166.380 MHz), then re-record
the bursts. Repeat this procedure in 2 kHz steps until you get a set of bursts with symmetric
spikes for all pulses.
Make note of this by changing the filename so it includes a '@FFF.FFF' portion indicating
the frequency to which the funcube was tuned when you recorded the tag. e.g.:
If the original name would have been:
tag435.wav
then the new name should be:
tag435@166.378.wav
to indicate that the funcube was tuned to 166.378 when the tag was re-recorded. Without the
@FFF.FFF portion, it is assumed the funcube was tuned 4kHz below the nominal tag frequency.
|