2018 Oct. 16: Download data to an Android Phone
Courtesy of Marco Aveiro of compudata.ca:
Just wanted to give you an update on that FTP over WiFi Hotspot on Android phones.
I was able to get it working using the following app that can be found in the google play store.

ES File Explorer File Manager

https://play.google.com/store/apps/details?id=com.estrongs.android.pop&hl=en_CA

I quickly edited a video together to showcase how this works once you turn
on the SensorGnome Wi-Fi hotspot:

https://www.youtube.com/watch?v=1pka5O9mb3E
2018 May 4: New way to download files from your SG-Pi
(Kudos to Adam Smith for reporting this!)
2018 Apr. 30: an update for the RPi 2/3 fixes:
unable to navigate into SD_card directory when accessing SG-Pi via FTP; this prevents data download.
After applying this update, your data files will be found on the SG-Pi's FTP server in
/media/SD_card/SGdata
This update is *not* cumulative.
Please note: recent versions of Firefox no longer support the FireFTP plugin, so we recommend
using the stand-alone program Filezilla as an FTP client for downloading files from
a running SG-Pi. (Thanks to S. Bliss for pointing this out.)
2018 Mar. 29: an update for the RPi 2/3 supports:
- newer Pi 3 boards from some manufacturers, with a more recent revision of the Broadcom processor
- an external USB hub can be plugged into USB port 4 of the Pi2/3, allowing for up to 10 total USB ports
with port number identification. See below.
This update replaces the broken update of 2018 Feb. 14
2017 April 30: a new image for RPi 2/3. All previous images and instructions
for this platform are unsupported and obsolete.
Features:
- support for rtl-sdr radio dongles
- WiFi hotspot (RPi-3) for wireless connection to the interface and data
- a new, simpler way to create your SD card
- support for gestures on an external pushbutton switch + LED:
- single click: show a 1/sec heartbeat and pulse detections on the LED
- double click: enable WiFi hotspot
- hold 3 seconds: shutdown the SG so the SD card can be safely removed.
These last three are intended to let you access your SG in the field
without having to open the box or mess with any cables. Alternatively,
if you're just trying to grab your data quickly and are willing to open
the box, then with safe shutdown, you can swap out the micro SD card
for a fresh one.
- the image includes all developer tools and sensorgnome-specific git repos
so you can customize in-place.
Disclaimer:
This release is barely tested, and aimed at high-engagement users:
- do your own testing before deployment
- accept the possibility of a total loss of data
- please file bug reports as issues at https://github.com/jbrzusto/sensorgnome
- support will be exclusively via the sensorgnomads google group; emails
to me (John Brzustowski) will be forwarded (and hopefully answered) there.
Have fun!
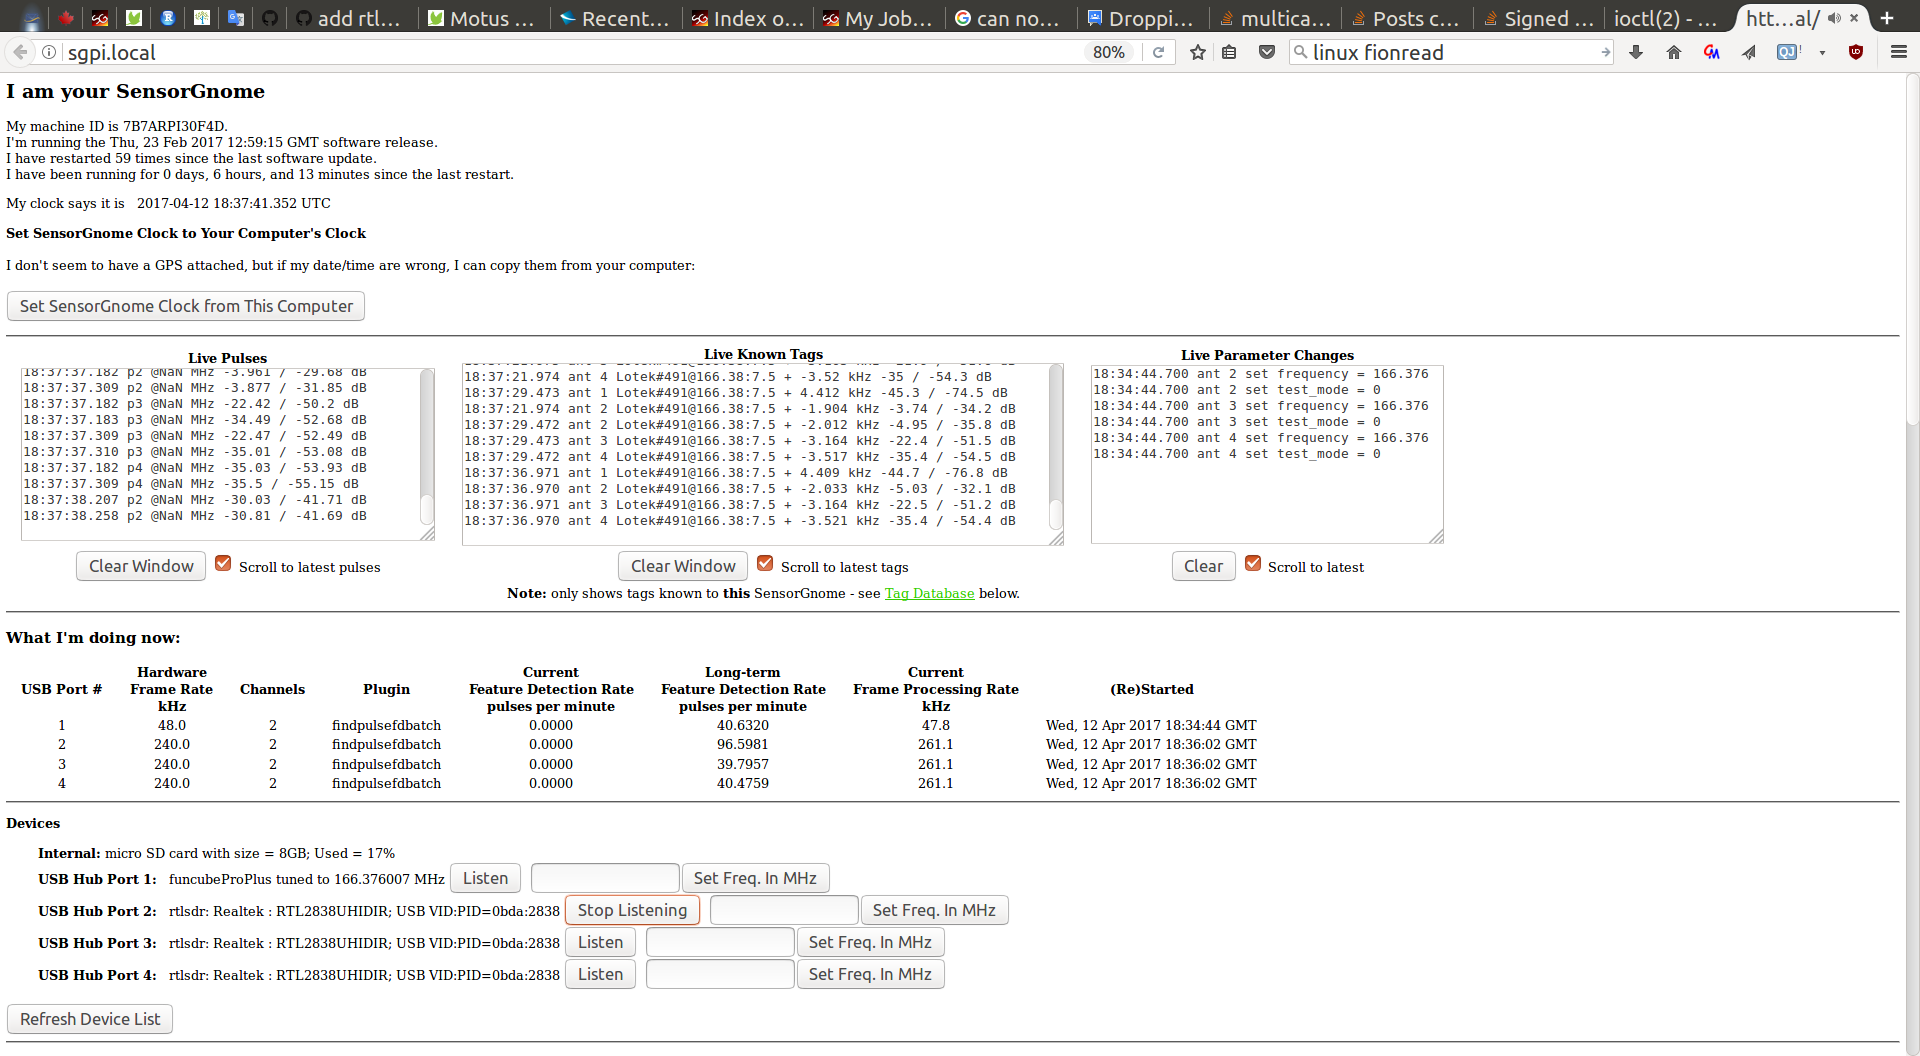
Connecting to the SGPi
- via WiFi hotspot: http://192.168.7.2 (web) ftp://192.168.7.2 (data)
WiFi Button Operation:
- single click: show a 1/sec heartbeat and pulse detections on the LED
- double click: enable WiFi hotspot
- hold 3 seconds: shutdown the SG so the SD card can be safely removed.
- via Ethernet cable: http://sgpi.local (web) ftp://sgpi.local (data)
Login credentials for FTP and ssh:
    user: pi
password: raspberry
I'm collecting a list of which machines these things work with here.
MAC address
Users setting up an SGPi on a wired network often need to know the MAC address to allow operation
behind a firewall.
For the RPI3, at least, the MAC address of the wired (ethernet) network adapter can be determined directly
from the serial number. For example:
Serial number: F783RPI36B63
                 ^^    ^^^^

MAC address:   B8:27:EB:83:6B:63
                        ^^ ^^ ^^
i.e. the MAC address always begins with B8:27:EB, followed by the 3rd and 4th digits/letters of the
serial number, then the 9th,10th,11th, and 12th digits/letters of the serial number.
RTL-SDR
At long last, USB radio dongles using the Realtek chip supported by librtlsdr will now work with
the SG. You select a desired software frame rate in deployment.txt, and the SG software will
automatically pick the smallest integer multiple (N) of that frame rate as the hardware sampling rate.
Currently, subsampling is done by simple decimation: only one out of N frames is passed from hardware
to the pulse-detection plugin. The parameters available for these devices now have (mostly commented-out)
settings in deployment.txt, and there is a pop-up menu which lets you set their values live.
The audio you hear by pressing the "Listen" button next to an rtlsdr in the device list
on the web interface can help you determine what the various parameters do.
WiFi Hotspot
The RPi-3 comes with built-in WiFi. By default, SG software leaves this off, but you can enable it in one
of two ways:
- wire a switch to your SG as described below, and double click on it to turn WiFi on, and then again to
turn it off.
This option is meant for use in the field, when you should not leave the WiFi consuming power and
providing access to your SG.
or
delete or rename the file GESTURES.TXT on the SD card. If this file is not present, the WiFi hot spot
is always on. NOT WORKING!
Hotspot details:
- ESSID: the SG's serial number, e.g. SG-26F1RPI358CC
- passphrase: the same SG serial number
- security: WPA
- SG network address: 192.168.7.2 (web interface, ftp server, and ssh server)
LED-Pushbutton Switch
If you wire in a switch like this one you can use it for simple closed-box interactions with your SG:
- single click: show a 1/second heartbeat blink, as well as fast flashes for any pulses detected on the antennas
another single click turns this off.
- double click: turn WiFi hotspot on (or off); while on, the LED blinks a slow on/off pattern
- hold for 3 s: perform a clean shutdown of the SG. The LED will light solid when shutdown begins, then turn
off when the system has powered down. Use this as a "Safely Remove" feature for the SD card
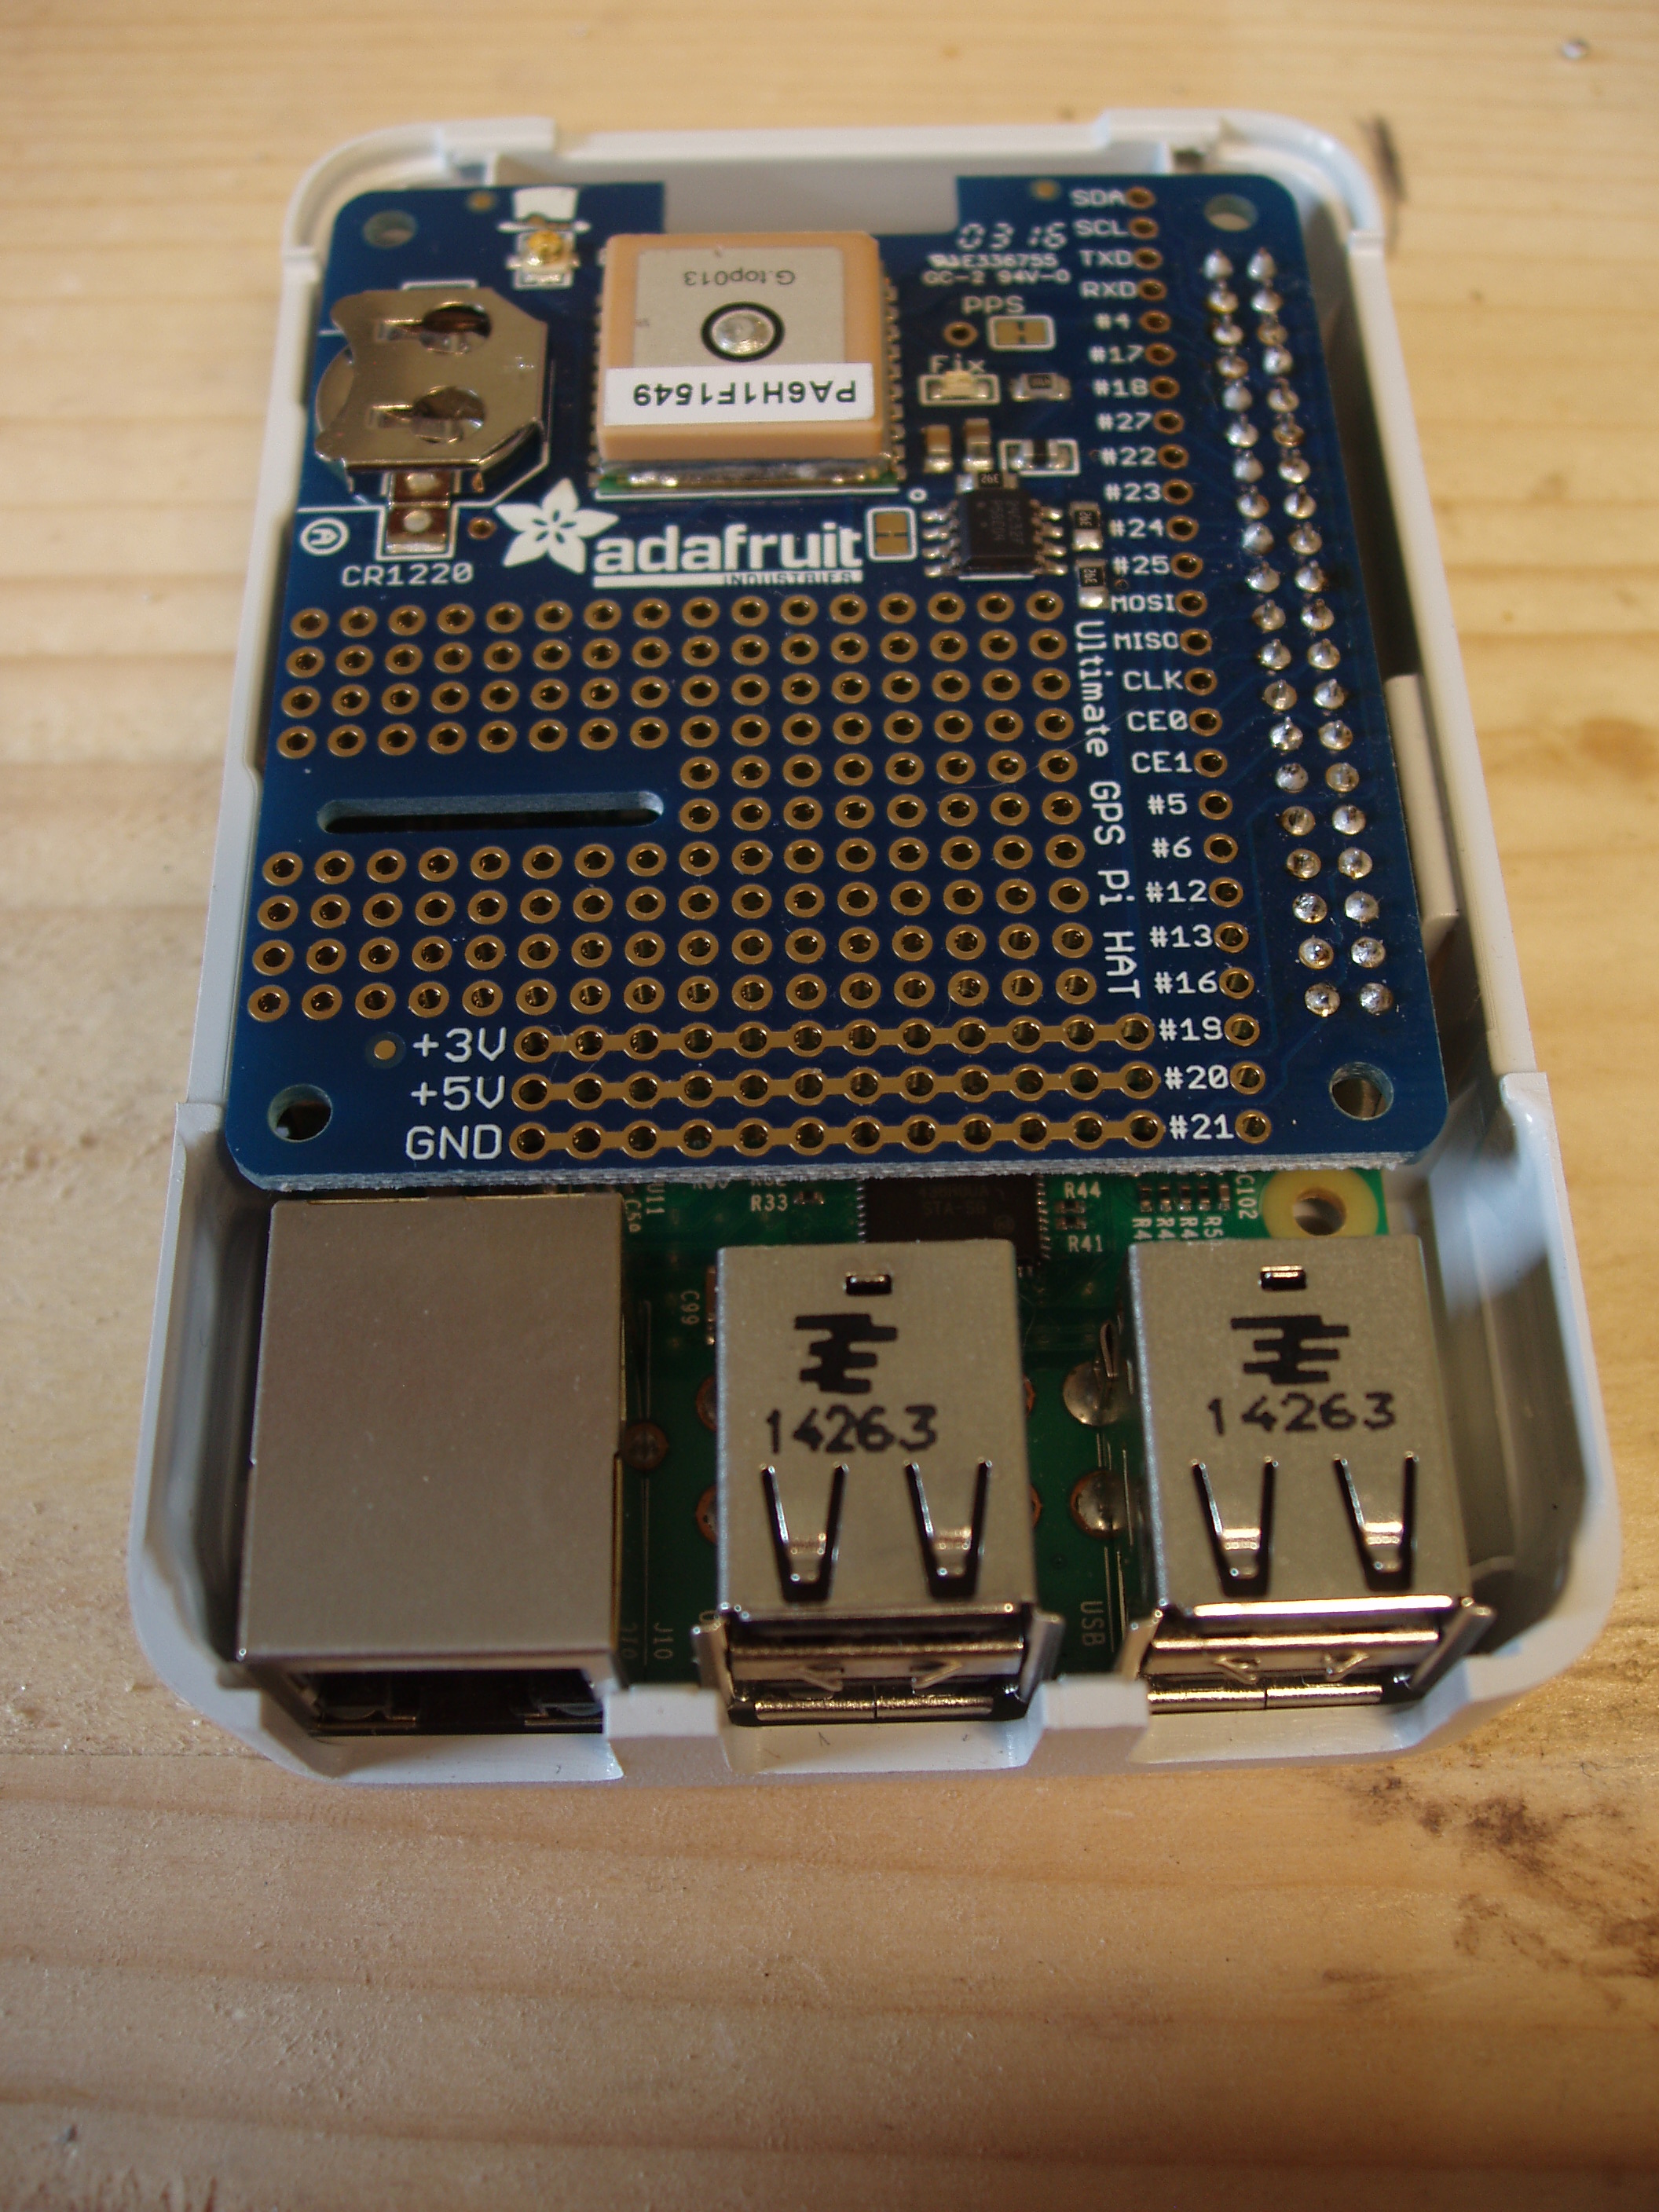
The switch must be wired to the Pi like so:
(-)   negative terminal ---------> ground
(C1)  common switch terminal ----> ground - use the same wire as for (-)
(+)   positive terminal ---------> GPIO#17
(NO1) normally open terminal ----> GPIO#18
The locations of these pins on the RPi 2/3 can be seen here.
To disable pushbutton/LED gesture support, delete or rename the file
GESTURES.TXT on the SD card (also visible in /boot when logged into the SG via ssh).
Create the SD card for your SG-Pi
This release comes with a simpler way to create the SD card:

Or in words that make it seem more complicated:
- insert a new 4GB (or larger) SD card into your laptop
or
- format a used SD card as VFAT using your laptop's OS or with one of the tools from here
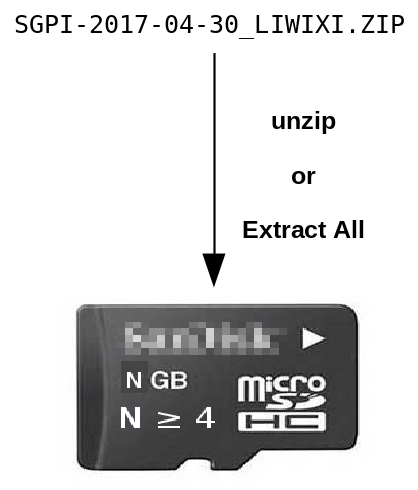
- download the most recent SGPI-YYYY-MM-DD from here and save it to your desktop.
(YYYY-MM-DD represents the year, month, and day of the software release; pictures
in this instruction show it as 2017-04-30, but you should use the latest version)
- unzip SGPI-YYYY-MM-DD_LIWIXI.ZIP to the SD card. This might take several minutes.
The top-level of the SD card should now contain files (e.g. config.txt) and folders (e.g. overlays).
It should not consist of a single folder called "SGPI-YYYY-MM-DD_LIWIXI". Here's what it looks like
in a file browser when done correctly:

- delete SGPI-YYYY-MM-DD_LIWIXI.ZIP from the SD card (if you had accidentally copied it there)
it is not needed on the SD card, and occupies space that could be needed for data.
- eject (e.g. via "Safely Remove...") the SD card from your laptop
- insert the SD card into the Raspberry Pi and power up.
CAUTION: make sure the unzip process is not creating a folder on the SD card called "SGPI-YYYY-MM-DD_LIWIXI" and
extracting files into that folder. The files such as config.txt and cmdline.txt must be in the top level of the SD card, not in
a folder. (Of course, there are also folders such as overlays which must be present there too.)
Here's how it looks when it's wrong because items are all in a folder on the SD card:

What's on the SD card
The SD card now holds all data and the SG operating system in a single DOS ("VFAT") partition.
Brief field guide to the contents:
- config.txt, cmdline.txt, start*.elf fixup*.dat, kernel*.img, bcm*.dtb:
startup files for Raspbian, the version of Linux that powers the SG-Pi
- SGPI-YYYY-MM-DD_LIWIXI_INITRAMFS_DO_NOT_DELETE:
minimal linux filesystem needed early in the SG's booting procedure.
- SGPI-YYYY-MM-DD_LIWIXI_IMAGE_DO_NOT_DELETE:
full linux filesystem; all the code which actually runs the SG lives here.
You can't do anything with this file from Windows or OS X without special tools,
but it's where you will find yourself after logging in via ssh.
- SGdata:
all data files recorded by the SG will end up here, in one subfolder per day.
This is what you see when you connect to the SG via FTP.
- uboot: this poorly-named folder holds miscellaneous configuration files needed by the
SG software: deployment.txt, SG_tag_database.sqlite, NETWORK.TXT, SENSORGNOME_VERSION.TXT
Do not delete or move any of these files:
they must be present and in the top level of the SD card for the SG to work.
For more details on simple install, see the liwixi repo at github.
Customization
This release of SG software comes with all developer tools needed to build it.
You will need to login to the SGPi via ssh (user:pi, password:raspberry)
to access the code and tools.
In /home/pi/proj are repositories for the main sensorgnome subsystems:
- sensorgnome - master control process; nodejs javascript, shell scripts, udev rules
- vamp-alsa-host - master data marshaller; C++
- vamp-plugins - pulse-detection plugin to vamp-alsa-host
- librtlsdr - modified rtl-sdr library and rtl_tcp data grabber; C
- fcd - funcube command-line controller; C
- liwixi - tool to generate easy-to-install linux blobs; shell script
If you make changes that you wish to install on other SGPIs, I recommend using liwixi
to create a new installable .ZIP archive from the Pi you're working on.
If you want to contribute changes you make back to the sensorgnome project,
please fork the corresponding repository from https://github.com/jbrzusto and
send me a pull request.
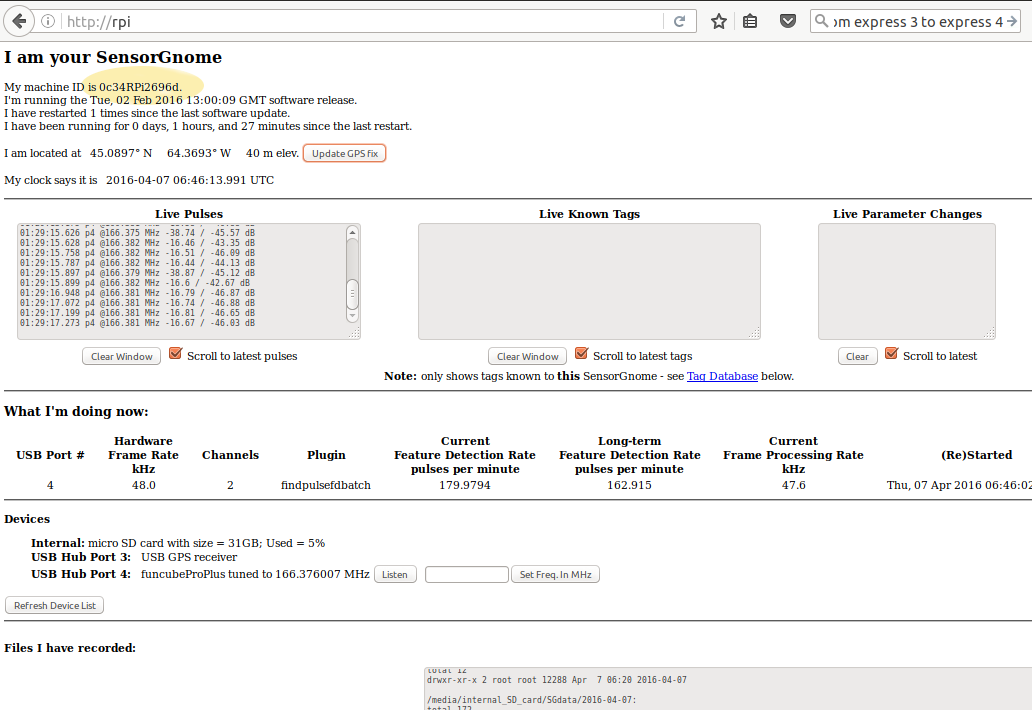
USB Port Numbering
All data acquired by a sensorgnome are labelled by the USB port
that the acquisition device is attached to. It is important to be consistent
about which antenna you have plugged into each USB port, so that your
data can be linked to antenna metadata, such as type, azimuth, etc.
The SG software numbers the four USB ports as so:

SG-Pi with External USB Hub
You can increase the number of ports on an SG-Pi2/3 up to 10 by using an external hub. To maintain consistent
port numbering, you must plug the external hub into the Pi's USB port #4.
With an external hub, ports are numbered like so:
- 1, 2, 3: the Pi's own USB ports 1, 2, and 3 (as shown above)
- 4: the 1st USB port on the external hub
- 5: the 2nd USB port on the external hub
- ...
- 9: the 6th USB port on the external hub
- 0: the 7th USB port on the external hub
As of the 2018 Feb 14 update, these external hubs are supported for the RPi2/3:
Port Numbering Diagram for External Hubs